

Cranks and Bottom Brackets
Instructions
Click on the links below to download (pdf format).
More Information
How do I convert my double/triple Rene Herse crank to a one-by?
All you need is a Rene Herse One-By Chainring, a set of Rene Herse One-By Chainring Spacers, and possibly a bottom bracket with a shorter spindle. You can use the same crankarms. The One-By Chainring Spacers take the place of the small chainring. The chainline will be the same as on the big ring of your current cranks (unless you change the bottom bracket).
How do I convert my one-by Rene Herse crank to a double or triple?
If you have Rene Herse cranks that are convertible to double/triple (with Rene Herse One-By Chainring Spacers in place of the small ring), the conversion is easy. All you need is a set of Rene Herse chainrings and possibly a bottom bracket with a longer spindle to create clearance for the small (and middle on a triple) chainring. (How much clearance you need depends on the size of your small/middle rings.) You can use the same crankarms.
Are Rene Herse One-By Chainrings compatible with Campagnolo’s 13-speed drivetrains?
We haven’t tested the Rene Herse One-By chainrings with 13-speed yet. We plan to do that soon.
What chainring combination should I run?
Read our article “How to Choose Your Chainrings.”
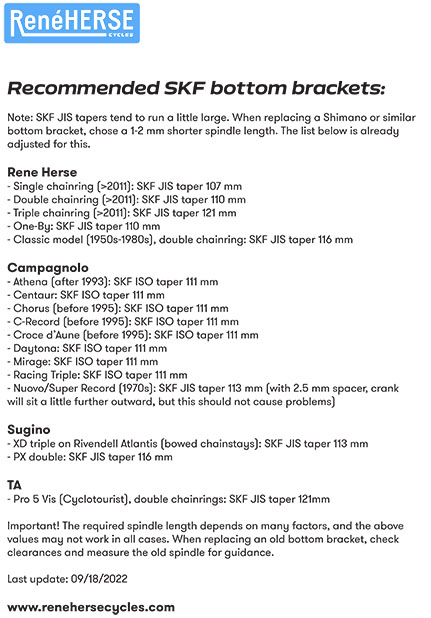
Not sure which bottom bracket you need?
Read our article “Bottom Brackets Demystified.”
Why do Rene Herse cranks use square-taper bottom brackets?
Read why a square taper works best with aluminum cranks.
My cranks make a creaking sound
Many creaking cranks are caused by a loose chainring bolt. This allows the chainring to move slightly with every pedal stroke. Also make sure your crank bolts are tight, and your bottom bracket cups are tight in the frame.
If those three areas are not causing the creak, then it probably does not come from the cranks. Creaks on bikes can be notoriously difficult to diagnose, because the frame acts like a sound board. Also check your seatpost’s bolts, push on your saddle on either side to make sure it isn’t causing the creak, and make sure your frame isn’t cracked somewhere – all of these can sound like a creaking crank.
My crankarm has come loose
If cranks come loose, it’s usually because the tapers were not greased or the crank bolts weren’t tightened enough. Usually, it is possible to reform the taper and get the crank to seat again. Stop riding the bike immediately when you notice the crank has come loose. Remove the crank. Grease the taper on the spindle. Use the steel crank bolt that came with the crank and tighten it as much as you can by hand. Use a lot of force. Our cranks are forged, and our crank bolts are made from ultra-strong Cromoly steel with rolled threads, so it’s almost impossible to overtighten the crank bolts with hand tools.
Ride the bike. After about 1 km (0.6 miles), tighten the crank bolt again, as much as possible. Repeat after 5 km (3 miles), 10 km (6 miles) and then five more times over the next 200 km (120 miles). Unless the crank taper is severely deformed, this usually reseats the crank and restores the taper. Continue to check the crank bolts every 6 months to make sure they remain tight. If the crankarm cannot be used any longer, we offer individual crankarms as spare parts (unlike most makers), so you don’t have to buy a complete new crankset.
My chainrings seem to wobble
First make sure that the chainrings wobble and it’s not frame flex you are seeing. (When you ride the bike, the frame flexes and the chainrings move because of that.) Dismount the bike and turn your cranks backward with your hands.
Check whether only one ring or all wobble. Usually all rings are out of alignment, and the cause lies at the crank/bottom bracket interface. The spindle has a small diameter, and even a very small misalignment translates into a visible wobble at the outer edge of the chainring.
First make sure your crank is seated all the way on the spindle. Grease the tapers and really tighten the crank bolt. If the wobble still persists, take the crank off the spindle and turn it 90 degrees before reinstalling it. This takes into account that the tolerances of the spindle and crank can either add up or cancel each other. You want to find the position where they cancel each other. Repeat with the cranks turned 180 and 270 degrees, and choose the position with the least runout. If that doesn’t get the runout of the chainrings to 1 mm or less, contact us.
If only one chainring wobbles, take it off an put it on a flat surface to check. If the chainring isn’t flat – which can (very rarely) happen due to stresses in the aluminum raw material – we’ll replace it under warranty.
